

How To Repair Vista Hard Drive As External Drive To Another Computer
Disk kick failure: Fix for Windows XP, Vista, 7, 8, 10
Get the gear up for the fault Disk Boot Failure on Windows XP, Windows Vista, Windows 7, Windows 8 and Windows 10.
Contents
- 1 About "Disk Boot Failure"
- ane.1 Description and Symptoms
- i.2 Symptom one: "Disk Boot Failure" error screen on startup
- 2 Causes of this Error
- 2.1 Crusade 1: Wrong BIOS kick order
- 2.two Cause 2: Faulty data cables
- 2.3 Crusade 3: HDD is damaged
- 3 Fixing "Disk kick failure" on Windows
- 3.i Fix 1: Alter BIOS boot guild
- iii.2 Ready #2: Remove newly installed hardware, cheque data cables and jumpers
- three.3 Prepare #3: Check HDD for failures
- iii.iv Fix #four: Run chkdsk
- 4 More than Information
- 4.ane Linked Entries
- iv.2 Support Links
- 4.3 Applicative Systems
Well-nigh "Deejay Kick Failure"
The following information on this error has been compiled by NeoSmart Technologies, based on the information gathered and reported by our global network of engineers, developers, and technicians or partner organizations.
Clarification and Symptoms
The fault messages, alerts, warnings, and symptoms below are tied to this fault.
Symptom 1: "Disk Boot Failure" mistake screen on startup
Every time a estimator is turned on, as function of the boot procedure the BIOS tries to observe a bootable drive to go along the loading process by starting its first sector. Notwithstanding, if BIOS is unable to discover a drive to boot from, so a "Deejay Kick Failure" mistake screen is displayed and the boot process is halted.
Here is an example of "Disk Boot Failure" error screen for all versions of Windows:

DISK Kick FAILURE - INSERT SYSTEM DISK AND Printing ENTER
Causes of this Error
This fault has been known to occur as a effect of ane of the following causes:
Cause 1: Incorrect BIOS boot order
The most common cause of this error is an incorrect guild of boot devices in BIOS. Usually BIOS tries to find a bootable drive co-ordinate to its boot device lodge, then if a PC has a floppy drive set up to a higher priority than a hard drive, and at that place is a floppy disk inserted – then the PC tries to kicking from a floppy disk, and a error bulletin is displayed.
Cause 2: Faulty data cables
Like all components of our PC's, hard drive data cables tend to deteriorate equally the fourth dimension passes. If the aforementioned data cable was used for several years(or even the same 1 across several computers), then information technology might me the crusade of periodic read/write errors that tin can affect the loading procedure.
Cause iii: HDD is damaged
A difficult drive can become damaged or inaccessible due to read/write errors, ability outages, or virus attacks. If that's the case, and so the bulldoze should be checked for errors and scanned for viruses to make certain that information technology works correctly.
Fixing "Disk boot failure" on Windows
Ready 1: Change BIOS kicking order
To check a computer's boot order, follow these instructions:
- Restart the computer
- Open the BIOS. If you're non sure which key is used to open BIOS, it's either whatsoever of the following or it'due south listed on the get-go screen that appears on the monitor, before the Windows logo appears.Possible keys: Esc, Del, F2, F8, F10 or F12
Notice the key guide in the top-right corner.
- Go to the Boot tab
- Change the gild to position the hd as the 1st choice
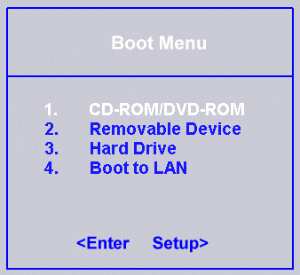
Kick Option Menu
- Save these settings
- Restart the calculator
Fix #two: Remove newly installed hardware, check data cables and jumpers
If a new hardware was recently added , follow these tips:
- Remove the newly added hardware and restart the computer to check if the error still appears
- Bank check the cables of the difficult disk where Windows is installed
- Check the jumpers of the hard disk
Fix #3: Check HDD for failures
To test if the hard disk has failed, use Easy Recovery Essentials' Automatic Repair. The Automated Repair process will study whatever issues establish with the hard disk drive or RAM retentiveness with 1 unmarried click:
- Download Easy Recovery Essentials
- Burn the ISO Image. Follow our instructions on how to burn a bootable ISO epitome. If you'd like to have a recovery USB instead, follow our instructions on how to brand a recovery USB.
- Boot into Easy Recovery Essentials
- Select Automated Repair
- Click Continue and expect for the Automated Repair process to finish. Automated Repair process will report any issues found with your hard disk or RAM memory:

To download Easy Recovery Essentials, click here.
Gear up #iv: Run chkdsk
The chkdsk utility can find if the estimator's difficult disk has certain issues.
If a PC has Windows XP installed, follow these steps to beginning chkdsk:
- Insert a Windows XP CD into the computer.
- Restart the estimator.
- Press whatsoever cardinal to kicking into the CD when you see the "Printing any fundamental to boot from CD" bulletin.
- PressR to startRecovery Console when the Options screen appears.
- Choose the Windows installation to be repaired, and type in the Ambassador password followed by theEnter fundamental to submit it.
- Blazon the following command, and press Enter : to submit information technology:
chkdsk C: /R
Where C: is the Windows installation drive
- Wait for the scanning procedure to stop, and restart the calculator.
Here is an example screenshot of what the PC's console output should look like once the chkdsk is consummate:

Windows XP Chkdsk utility results screen
If a PC has Windows Vista, vii, 8 or 10 installed, follow these steps instead:
- Boot from a Windows install disc
- Click on Repair your co mputer after selecting proper linguistic communication, fourth dimension and keyboard input.
- Select the Windows installation drive, which is usually
C:\, and click Next - Choose Command Prompt when the Arrangement Recovery Options box appears
- Write the following command and press Enter afterwards:
chkdsk C: /f
Replace C: with the letter of the alphabet of the driver where Windows is installed.
Hither is an example of what the PC's console output should wait like one time the chkdsk.exe is complete:

Windows 7 Chkdsk utility results screen
More Information
Linked Entries
- chkdsk
Back up Links
- Easy Recovery Essentials for Windows – our repair and recovery disk.
Information technology's an piece of cake-to-employ and automated diagnostics deejay. It's bachelor for Windows 8, Windows 7 and Windows Vista. It'due south likewise available for Windows XP and Windows Server.
Read more at Windows Recovery Disks.
- The NeoSmart Support Forums, member-to-member technical support and troubleshooting.
- Go a discounted cost on replacement setup and installation discs: Windows XP, Windows Vista, Windows vii, Windows 8, Windows 10.
Applicable Systems
This Windows-related knowledgebase article applies to the post-obit operating systems:
- Windows XP (all editions)
- Windows Vista (all editions)
- Windows seven (all editions)
- Windows eight (all editions)
- Windows eight.i (all editions)
- Windows ten (all editions)
Propose an edit

How To Repair Vista Hard Drive As External Drive To Another Computer,
Source: https://neosmart.net/wiki/disk-boot-failure/
Posted by: donaldsonherry1947.blogspot.com
0 Response to "How To Repair Vista Hard Drive As External Drive To Another Computer"
Post a Comment